


Manual steering rack removal and replacement
If your Capri has vague steering, or wanders across the road, or moves about alarmingly under heavy braking then it is more than likely that the steering rack is worn and needs replacing. This job is fairly straightforward to tackle and it is a good idea to do other jobs such as brake disc replacement at the same time as the same bits need to come off.
Steering racks are still easy to get hold of. They are all reconditioned units but are clean and nicely painted and all the internals are replaced and new gaiters fitted. The rack is surprisingly cheap to buy. Mine was £25 from Partco (plus £10 exchange deposit). This does not include the track rod ends which should also be purchased and cost around £12 per pair. The other thing you should get is a new set of bushes for the rack. I recommend splashing out on a set of Superflex ones which will set you back around £9 for the two. You also need to allow some money to get the tracking set professionally which now costs in the region of £20. There is no way that you can do this accurately yourself.
Another part to the job which may or may not be necessary is the removal and overhaul of the steering coupling. This is the jointed shaft that connects the steering rack to the steering wheel and it has a rubber bush assembly that can be overhauled. Again this gets slack over time and causes vagueness in the steering. The purpose of it is to absorb nasty vibrations as they try to travel up to the steering wheel. I overhauled mine with a kit from the Capri Club which costs £7 and details are listed here. You can change the whole assembly and I believe CCI still sell the pucker item for around £40.
Assuming that you have located all the parts replacing the rack is as follows:
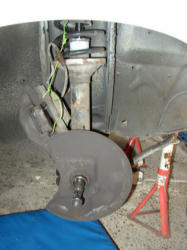 Firstly you need to make sure that your steering wheel is straight and the wheels are pointing straight ahead. Loosen off the front wheel nuts and jack up the front end of your car. With axle stand located on the front anti roll bar mounts remove both road wheels and place under the car. The two track rod ends of the steering rack need to be removed from the struts by undoing the castellated nut (there may be a split pin to remove with pliers first) so that it is flush with the top of the thread. With the aid of a block of wood strike this hard with a hammer until the track rod end separates from the strut. The two end of the steering rack should now be free.
Next job is to unbolt the two U-
The rack is now only held in place by the pinion shaft which is connected to the steering coupling. Crawl under the car and unbolt the lower union on the steering coupling. The pinion rod on the steering rack has a splined end and this slides into this joint when loose. The bolt must be removed by gently tapping it out before separating the joint. The best way to separate the joint is to tap the steering rack forward with a hammer and eventually the splined end will separate. This can take quite a bit of tapping to get it out so be patient!.
The steering rack is now completely free of the car and can be removed by sliding it left and right and dropping it down.
As I mentioned earlier it is impossible to set the new rack properly without the aid of a professional garage but it is vital that you do all you can to make sure the new rack is set up as closely to the old one as possible. Take the new rack out of the box and attach the new bushes (they are split to make this easy). Lay the old and new racks side by side and measure their length. Don't assume that the new rack is positioned in a central position. The best thing to do is attach a  pair of mole grips to the pinion and rotate it end to end and find the mid point position by counting the number of turns. The next thing to do is to attach the new track rod ends to the new rack. You will have to remove the old ones off the old rack to recover the locking nut which is not normally included. Release the locking nut with an open ended spanner whilst holding the track rod end itself using another spanner (there is a flat of metal to do this). Count the number of turns as you undo and remove the track rod. Transfer the nut over to the new rack and screw on the new track rod using the same number of turns. Repeat for each side and lock the track rods in place with the lock nut (18-
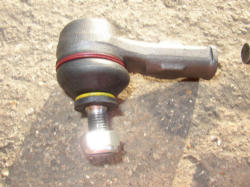
I have to say that the track rod ends were in a dreadful state on my car with one particularly bad (see photo). There was about three millimetres of movement in it! No wonder my steering was so bad. The old rack was also very loose compared with the new one.
 The new rack is now ready to fit to the car but if you are overhauling the steering joint then this must be done next. To remove this crawl under the car and undo the top union which is located close to where the steering joint enters the bulkhead. Remove the bolt and tap the splined end out with a hammer. Again this is not very easy but I managed to get the hammer onto the side of the lower union and by rotating and tapping the spline eventually separated.
with the steering coupling out of the car it is time to dismantle the rubber coupling and replace using the parts in the overhaul kit. It is important that the bits go together in the correct way and I decided to photo the union first and used a picture as a reference point. The original Ford union is riveted together and the overhaul kit replaces these with bolts. To remove the rivets you need to attack them with a hacksaw. Best to clamp the whole thing in a workbench to do this. With the four rivets sawed apart the coupling will fall to bits. The kit has a diagram showing how the parts go together. The new rubber coupling is very stiff and you need to squash it a bit to get the four bolts located. Make sure the safety device (butterfly shaped piece of metal) is located exactly as before. There are a set of tabbed washers to fit which go between the two halves. It took me about an hour to get this rebuilt (see before and after photos).

Having got this far bear in mind that the steering wheel is completely free and will no longer be aligned. If it is not almost straight when you are finished then there won't be enough adjustment in the rack to get it straight. I recommend doing it this way:
First locate the rack on the cross member so that the bushes are in their seats and get the u-
The other end does not have a flat on it so the splines will connect in any position. However at this point get a friend to sit in the car and hold the steering wheel dead straight. Now locate the splined end in this position. In this way the steering wheel and wheels will still be pointing forward when you are finished. The splined end should now be tapped into the union. As you tap this end the other end will move forward and you will know when to stop because the bolt will pass through the hole. This isn't that easy to do and I had to prise the union open a bit with the end of a chisel as I tapped. Eventually you will be able to tap both the bolts through and retighten them (12-
With that bit finished you can now tighten down the U-
All that remains is to refit the track rod ends to the wheel struts. Locate them in the holes with a bit of tugging on the strut. The new ones I fitted had a nylock nut so no split pin was required. Tighten these up progressively to allow the ball joint to pull itself up into the joint. Use a torque wrench to tighten the nut to 30-
To finish the job make sure that the locking tabs are tapped back into place (use an old screwdriver and hammer) and then refit the wheels. Lower the car to the ground and check the steering wheel is straight ahead. Go for a test drive and don't be surprised if the steering wheel is not dead centred. If it is more than a quarter of a turn out then you have a problem which can be resolved by undoing the steering coupling bolts again and sliding the coupling down off the top union. Turn the steering wheel straight and get someone to hold it tight while you relocate the splined shaft. Tap back into place and refit the bolts again. I hope you don't have to do this bit again as it is not much fun!
Last thing to do is to find a good garage who can do steering geometry. Ask them to set the tracking so that the toe in value is 1mm. This is the minimum setting and will prevent excessive tread wear. They should also be aware that the steering wheel will need centralising during the adjustment.
I think you will be very pleased with the improvement in steering and stability under braking. You have also saved yourself a lot of money!
This  web page is owned
and operated by Mark Swetnam
Last updated 14/11/25
©1995 to 2025
E-
Keeping 'The Legend Alive' on the World Wide Web since 1995!